The winter months are creeping up on us. As someone living in Maryland and the surrounding areas, the only thing you can expect is cold, snowy, windy weather that’s completely unpredictable. That’s why the team here at Rowbel Services recommends that you prepare your HVAC unit and home for the winter weather ahead of time, so you’re not out of luck as soon as the first winter storm hits.
However, we recognize that not many people may know how to prepare their homes for the winter, which is why we’ve compiled this helpful guide for you. You’ll learn all the necessary steps on how you can best prepare your HVAC unit and home for the winter season so you can stay as safe and warm as possible.
Step One: Review Your Last Regular Maintenance Inspection
The first thing you’re going to want to do to prepare your HVAC unit for the winter time is to review the last appointment you had for regular maintenance. If it was more than six months or even more than a year ago, we recommend you schedule an appointment for a tune-up. This way, you’re ensuring there are no major fixes that need to be implemented before the harsh weather hits. The last thing you want is for it to be in the middle of the winter without a working HVAC system!
Step Two: Clean All Your Vents
You’ll want to take some time with this one. Although it may seem easy and like you can just push it off to another season, it’s crucial that you don’t skip this step. Cleaning your air ducts and at the very least vent openings will allow you to remove any large pieces of debris, dirt, and dust away from the openings.
This does a few things for you. You’ll be able to have proper air circulation throughout your home without worrying about dust blowing all over the place. You also don’t have to worry about fire hazards. Dust is highly flammable, and if hot air is constantly blowing against dust inside of your ductwork, there’s a potential that the dust will catch on fire.
Step Three: Change Your Air Filter
This step goes right along with the last one we talked about. After you finish cleaning your vents and ductwork, we recommend changing your air filter. We recommend that you change your air filters every 90 days (about three months or the start of a new season) so the quality of air that’s circulating through your home stays high. Not only will you breathe fresh air, but you’ll be able to avoid harsh allergies as you transition into wintertime. There’s nothing worse than being cold in the winter and being stuck with bad allergies while you’re trying to stay warm!
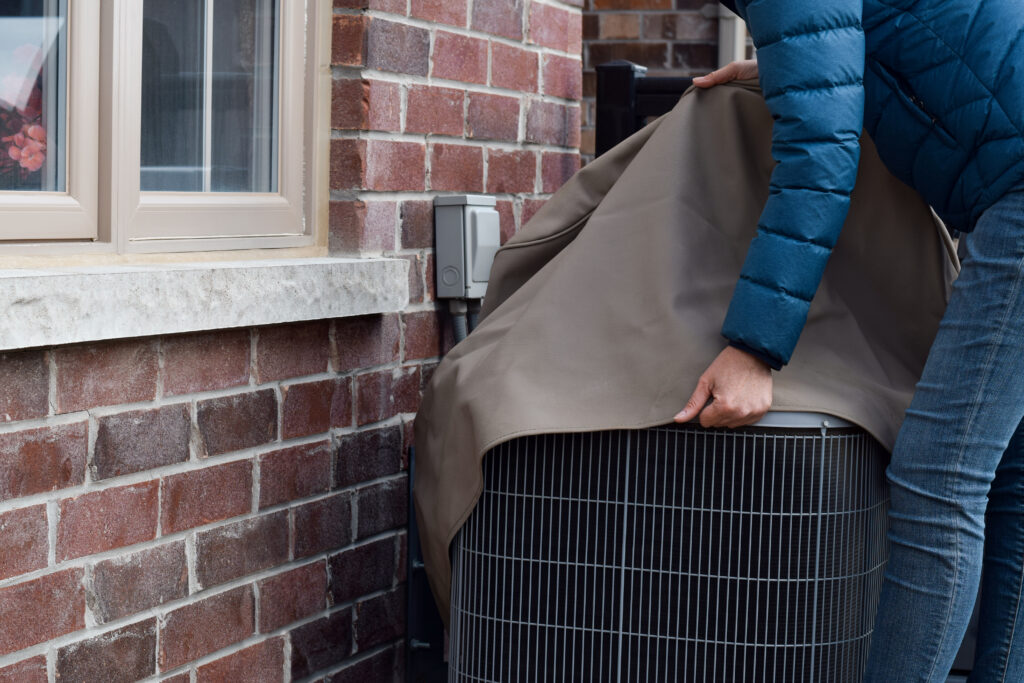
Step Four: Completely Shut Down and Cover Any Outside HVAC Pieces
After taking care of your vent work and air filters, it’s time to go outside and evaluate your outdoor HVAC equipment. Usually, certain parts of your air conditioner are installed and stay outside.
You’ll first want to make sure all of these pieces are powered down and not functioning for safety reasons. Next, you’ll want to physically inspect your AC unit to ensure there’s nothing missing or broken. If there is, we recommend scheduling a tune-up to get it fixed as soon as possible. If everything is good to go, you should then cover your AC unit so it doesn’t get snow or ice stuck in it. Too much water in your AC unit is potentially damaging and could cause expensive problems in the future if they’re not prevented now.
If you receive a regular tune-up before the winter time, some HVAC technicians will even bring a cover for you and install the cover so you don’t have to.
Step Five: Visually Inspect and Clean Your Furnace
As someone living in a cold climate, you’re going to want to make sure your furnace is in top condition before you use it. The first step of this involves visually inspecting and cleaning your furnace. While inspecting it, make sure to look for any noticeable cracks or areas that have any breakage. These types of things need to be fixed as soon as possible so your furnace runs as smoothly as it can. It never hurts to get an outside opinion, either. If you’re not sure whether or not your furnace looks ‘normal’, call someone to help! The folks here at Rowbel Services are more than happy to inspect your furnace and perform a tune-up for you so you’re good to go when you need your furnace the most.
After inspecting your furnace, it’s time to clean it. Taking a dust rag and removing all the dust and debris from the outer casing, any vents, tubing, and electrical connections ensures that debris won’t get in the way of your furnace performing the most efficiently. Additionally, most furnace instruction manuals will give you specific instructions on how to take portions of your furnace apart for cleaning. It’s recommended that you clean your blower after cleaning the outside parts of your furnace.
Step Six: “Test Run” Your Furnace and Thermostat at Least Three Times Before Winter
This is one of the most important steps to follow in order to adequately prepare your HVAC system for the winter time. Usually, in the winter, you’ll only use your furnace to heat your home. To ensure everything is working and in good shape, it’s a good idea to test your furnace at least three times during the fall/early winter season before the harsh weather is there to stay.
Three times may seem like overkill, but testing your furnace and thermostat multiple times ensures that everything works, and works consistently. We recommend programming your thermostat to your usual winter temperatures on three separate occasions, letting your furnace turn on for a duration of time, and turning the temperature back down again. There are many benefits you as a homeowner gets from conducting thorough testing:
- You guarantee both your thermostat AND furnace work beforehand
- You have adequate time to perform any maintenance before winter hits
- You’ll save money during winter knowing your equipment works beforehand
While you test your furnace, be sure to listen for any sounds that aren’t normal. Things such as rattling, loud clanging, and rough whirring sounds are all indicators that something is loose or needs to be replaced. You’ll also be able to test for cold spots throughout your home to make sure it’s working in all locations. It’s better to be safe than sorry!
Step Seven: Ensure You Properly Program Your Thermostat
With all the new technology coming out, the use of smart thermostats is on the rise. However, even smart thermostats need to be programmed properly so you can ensure you and your family stay warm during the coldest winter moments.
Regardless of the thermostat type you have, there are different things you have to remember when programming your thermostat. Some of these things to keep in mind are:
- What is your preferred winter temperature?
- Do you prefer sleeping in colder temps or warmer temps?
- What times do you prefer the temperature to change?
- How long do you want your home to stay warm?
Keeping these factors in mind allows you to properly program your thermostat so you don’t forget any part of your ‘thermostat schedule’. Once you’re done programming your thermostat, all you have to do now is enable it when you want your winter heat schedule to start kicking in.
Step Eight: Consider Creating Different Zones Throughout Your Home
If you’re like many homeowners, you’ll notice that some areas of your house are naturally warmer or cooler than others. Spaces like your kitchen and living room that have lots of technology are more likely to be hotter, while areas like your bathroom and bedroom may be cooler. Whatever the case is, it may be wise to consider creating different climate zones throughout your home to accommodate these different areas properly.
A climate zone is simply a way to section off different areas of your home and allow them to reach different preferred temperatures. There are a few different methods you can use to create climate zones. You can create climate zones by room, or by the floor of your home if you’ve got multiple floors. All you need to do is have different thermostats installed for each zone, and you’re good to go!
Step Nine: Schedule Any Maintenance Services if Need Be
After all, is said and done and you’ve completed all other preparation tasks, all you need to do is schedule any maintenance services if your HVAC system needs them. This can be anything from fixes to even a new furnace altogether. If you’ve got nothing that needs fixing, we recommend that you schedule a regular tune-up if you haven’t had one already. This will give you peace of mind going into the cold, winter season knowing that everything works how it should.
If you’re looking for a professional and passionate company to perform your maintenance and regular tune-ups, look no further! Rowbel Services is here to help you out. With years of experience and numerous 5-star reviews on Google, Rowbel Services is your dedicated Maryland HVAC company. We can do everything- HVAC maintenance, preventive maintenance, and brand-new HVAC installations. We can also ensure your lighting and electrical work is on point before winter starts! Contact us here to get started today. We can’t wait to hear from you!
Step Ten: Prepare Your Humidifier
Although your HVAC system doesn’t necessarily include a humidifier, it’s a good idea to get one up and running to prepare it for the dry weather during winter. Homes are notorious for circulating dry air throughout the winter, which can pose numerous risks if it isn’t taken care of. Here are some issues that may arise if you have too much dry air circulating throughout your home:
- You may be more prone to contracting illnesses and viruses (dry air helps viruses circulate easier)
- Your skin will be drier
- Static electricity will build up faster
- Moisture will be pulled from any wood furnishings or appliances, possibly ruining them
Besides these factors, no one likes the feel of dry air! A humidifier will help relieve this issue, which is why we recommend preparing one ahead of time so you don’t have to worry about it during winter.
In order to properly prepare a humidifier for the winter, there are a few things to look out for. First and foremost, make sure the humidifier works when it’s turned on. After ensuring it works, power it down and remove the water reservoir to clean it out. This prevents mold spores from circulating through the air. While you’re at it, it’s a good idea to clean the exterior of the humidifier as well so the vents and openings are clear from any dust and debris.
Step Eleven: Wait For Winter!
The last thing you need to do is hurry up and wait! By now, you’ve inspected and cleaned your furnace ahead of time for the winter. After having your preventive maintenance tune-up, you have a professional second opinion in knowing that everything works exactly how it should. All you need to do now is wait for the winter weather to arrive, and enjoy the cold from the warmth of your properly-heated home.
In Conclusion
When the winters in Maryland are about as harsh as they can get, you never want to be caught without a working HVAC system. Being prepared ahead of time before winter strikes guarantees everybody is happy and healthy during the coldest time of the year. After reading, hopefully, you’ve found some useful information to help prepare your HVAC system for winter before winter hits. Have a great winter!